After a terrible storm, your roof may have terrible damage. Whether or not it’s obvious at first, water infiltration, mold, mildew, ruined possessions, and ill health all follow major roofing damage. You’ll need emergency roofing repairs to protect you, your loved ones, and your home from further harm.
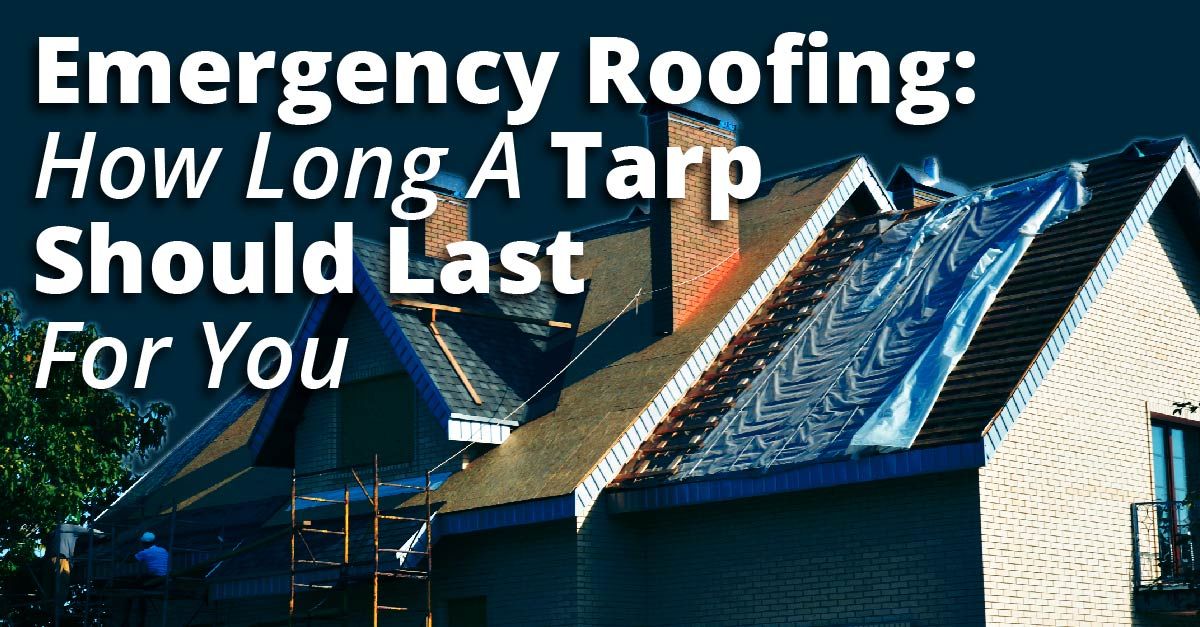
Emergency roofing usually starts with a tarp (a large sheet of plastic or rubberized fabric that temporarily keeps out water)—but it’s not as simple as it sounds.
Not for Amateurs
Even in the best conditions, your home’s roof is no place for amateurs. After a storm, the risk of injury increases dramatically. Before any discussion of tarping, we need to make clear: stay off your roof!
Tarps are a quick step taken immediately after storm damage. Thrown over any kind of roof, but especially useful over shingle roofing, a single large tarp will ride up and over the roof ridge, helping to shed water.
Most residential roofers who handle emergency roofing calls come equipped with these tarps. Because one waterproof sheet goes seamlessly over the entire roof, the damaged roof is preserved. No more damage can occur while the roof waits for repair.
Proper Installation
Two types of tarp installation are typical after a storm:
- Temporary — Thrown over your home’s roof literally as the last raindrops fall, a temporary tarp is anchored to your roof along the bottom, and side edges only. Water stays out of your home without nail holes through the surface or ridge. Furring strips or weighted sandbags can prevent wind uplift.
- Long-Term — A long-term tarp may have to be placed while insurance issues, scheduling, or contract terms are tidied up. In this case, a more substantial tarp, more thoroughly fastened, will serve as a roof replacement.
When Should I Go for Long-Term Roof Tarping?
High-grade and heavy tarps with UV protection are a considerable investment if your emergency roof repair is expected to last three months. Investing in a high-quality tarp that can last longer can save you money.
Long-term tarping allows breathing room, but remember, your home cannot be energy efficient, completely water resistant, and comfortable with just a tarp on the roof. They support and protect your home while your roofing contractor makes the necessary replacement or long-term repairs.
How Do You Set Up an Emergency Roof Tarp?
An emergency roof tarp can provide temporary protection for your roof while you and your contractor decide on a permanent solution. When properly installed, roof tarping can protect your home from inclement weather for up to 90 days. Here is a step-by-step guide to roof tarping.
1. Assess Damage
After the storm has passed, begin assessing the damage. An inspection can help determine whether emergency roof repair is necessary. Wear appropriate safety equipment such as boots, gloves, and goggles. Inspect the surface for signs of damaged shingles and components. Clear the surface from any leaves, branches, and debris.
2. Measure the Area
Use a measuring tool to determine the surface area to be covered. After taking note of the measurements, choose a heavy duty-tarp in the appropriate size. Thick tarps with UV inhibitors meant for outdoor use are ideal, as these qualities can help it last longer and withstand the elements better.
3. Position & Secure the Tarp
Your tarp should be properly positioned and secured to ensure adequate protection and prevent it from coming loose. Place it on the damaged area and stretch it as far as possible, ideally extending at least 3′ on all sides. You can secure the tarp using sandbags for a temporary measure. For a longer-lasting fix, nail the tarp to anchor boards that can be screwed into your roof temporarily.
Roof tarping is a temporary solution, not a replacement for emergency roof repairs. Ensure to have your roof inspected and repaired as soon as possible to avoid damages from worsening.
Will a Tarp Help a Leaky Roof?
In the aftermath of a storm, your roof can develop leaks, requiring emergency roofing services. To minimize water damage before emergency roof repairs can be done, you can opt to cover the compromised part of your roof with a tarp. When properly installed and secured, tarps protect your property from further water damage and adverse weather conditions.
When dealing with water damage, taking this extra precaution is critical when filing claims under your homeowner’s insurance policy. Not taking proactive measures to limit storm damage can result in your provider refusing to cover damages.
How Long Can You Leave a Tarp on a Roof?
Tarps are made of polymeric materials that are resistant to water, ice, and air. Tarps typically last up to 90 days on the roof, while those constructed of more robust materials can last up to two years. Roofing contractors recommend not keeping it for more than three months, which can lead to further issues.
How Much Do Emergency Roof Tarps Cost?
On average, you can expect to spend anywhere from $200 to $1,500 when investing in roof tarping. Tarps that can adequately protect your property from damage should be waterproof and thick enough to withstand the elements. Costs vary depending on several factors, including the following:
- Tarp Size and quality
- Property location and accessibility
- Roof pitch & slope
- The extent of roof damage
- Additional materials to used (Nails and “2×4”)
If you choose to hire your local roofing contractor, you’d also have to factor in labor costs and emergency premium charges. Fortunately, most roofing contractors provide detailed estimates.
Reach Out to Roof Repair Specialist for Roof Repairs
If your roof has been compromised by inclement weather, reach out to our roofers. Roof Repair Specialist is your local, reliable Southern California roofer. We are ready to provide roofing repairs, protect your home with tarps, and find permanent solutions to your roofing problems. Contact us today!